Strings 1 and 2 have picked up a little buzz on my guitar. The action is just a little too low. What kind of adjustment can I make to solve the problem?

To address the buzzing on strings 1 and 2 (high E and B strings) due to low action on your guitar, here are a few adjustments you can consider:
- Adjust the Bridge Saddle Height:
-
For Electric Guitars: Most electric guitars have individual saddle screws for each string. You can raise the saddles for strings 1 and 2 by turning the screws clockwise. Use a small screwdriver or an Allen wrench, depending on your guitar’s design. Make very small adjustments (like a quarter or half turn) and check the action after each adjustment to avoid overdoing it.
For me clockwise did not work, 1/2 turn CCW worked
-
For Acoustic Guitars: If your acoustic has an adjustable bridge (like some newer models or those with compensated saddles), you might be able to adjust these similarly. However, many acoustics don’t have this feature, so you might need to:
- Shim the Saddle: If the saddle is too low, you can shim it by adding a thin piece of material (like a piece of cardboard or plastic) under the saddle to raise it slightly. This increases the action. Ensure the saddle still fits snugly after adding the shim.
- Neck Relief Adjustment:
-
Sometimes, the buzz isn’t just from the action at the bridge but also from the neck relief (the curvature of the neck).
- Truss Rod Adjustment: If the neck is too straight or has back-bow, adjusting the truss rod to introduce a slight forward relief might help. Turn the truss rod counterclockwise slightly to relieve tension. Remember, this should be done incrementally as too much adjustment can lead to other issues. After adjusting, check the relief by holding down the first and last fret of the string in question and seeing the gap at the 7th or 8th fret. You want about the thickness of a business card for most guitars.
- Nut Height Adjustment:
-
If the buzzing is particularly bad at the first few frets, the slots in the nut might be cut too low. This is a more delicate adjustment:
- Filing the Nut: If you’re comfortable with it, you can file the slots for these strings slightly higher, but this is precision work and might be better left to a professional luthier.
- String Gauge:
- Sometimes, switching to a slightly heavier gauge string can help reduce buzzing because they have more tension, which can lift the action slightly. However, this also changes the feel and sound of your guitar, so it’s worth considering if you like the current string feel.
After making any adjustments, always play the guitar to check if the buzzing has stopped without affecting playability negatively. If adjustments seem beyond your comfort level or if they don’t resolve the issue, consulting with a professional guitar technician might be the safest route to ensure your guitar plays and sounds its best.
How do I measure the action? How can I get the distance between a string and fret?
Here’s how you can measure the action (string height) on your guitar and determine the distance between a string and a fret:
Measuring Action:
- Tools Needed:
-
Capo (optional but helpful for consistency)
-
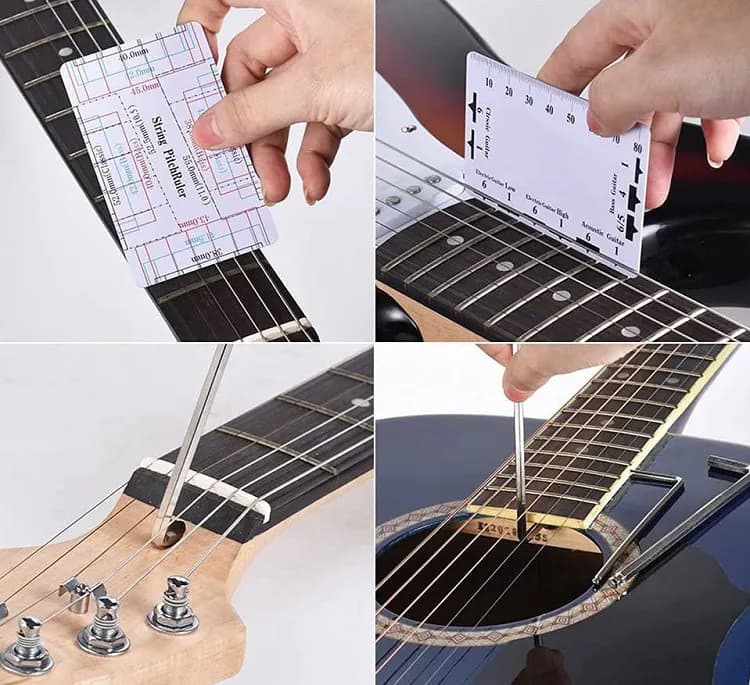
Feeler Gauge or Ruler (a feeler gauge is more precise; a ruler should be thin and accurate, preferably in 64ths of an inch or mm)
- Steps to Measure Action at the 12th Fret (commonly measured point):
-
Prepare the Guitar: Tune your guitar to standard pitch. If you’re measuring the action on both the bass and treble side, it might be useful to use a capo at the first fret to ensure the neck isn’t pulled down by string tension when you measure.
-
Action at 12th Fret:
-
For electric guitars, you typically measure from the bottom of the string to the top of the 12th fret:
-
Low E (6th string): Around 5/64" (2 mm) is common, but can vary based on preference.
-
High E (1st string): Around 4/64" (1.6 mm) is common.
-
-
For acoustic guitars:
-
Low E: Around 6/64" (2.4 mm)
-
High E: Around 5/64" (2 mm)
-
-
-
Measurement:
- Place your ruler or feeler gauge perpendicular to the fret and under the string at the 12th fret. For an accurate measurement, press the string down at the first fret (or use a capo) to simulate the string’s tension when played, then measure at the 12th fret.
- Measuring String to Fret Distance at Other Points:
-
If you want to check or adjust the action at other frets, the process is similar:
-
First Fret: This is where you’d check if the nut slots are too high or low. Here, you might measure from the bottom of the string to the top of the first fret without pressing down on any frets; this measurement tells you about the nut slot height.
-
Any Other Fret: For diagnosing buzz or checking relief, you can measure at any fret by holding the string down at the fret just before the one you’re measuring (e.g., to measure at the 5th fret, hold down at the 4th fret) to see how much clearance there is.
-
Tips:
-
Precision: A feeler gauge gives you precise measurements in thousandths of an inch or fractions of millimeters, which is better for small adjustments.
-
Consistency: Always measure with the guitar in the same playing position, as the neck’s angle relative to gravity can slightly alter measurements.
-
Neck Relief: If you’re measuring to check or adjust neck relief, you’ll want to measure the gap at the 7th or 8th fret when the string is held down at the first and last fret.
-
Adjustments: Remember, after making truss rod adjustments, you might need to retune the guitar and possibly adjust the bridge saddle height again to get the action just right.
If these measurements or adjustments seem daunting, it’s always a good idea to have a professional setup done, especially if you’re new to guitar maintenance.